Chocolate Cheesecake with Oreo Cookie Crust
I’ve found most chocolate cheesecakes to be on the dry side, but not this one. This one, which contains just a hint of coffee flavor, is moist and creamy and downright delightful.
The crust is made with Oreo cookies, a little bit of confectioner’s sugar and butter. Yummy.
Crust
- 24 vanilla-filled chocolate sandwich cookies (e.g., Oreos)
- 1/4 cup confectioners' sugar
- 6 tablespoons melted butter
Filling
- 1/2 cup milk
- 2 cups semisweet or bittersweet chocolate chips
- 1 teaspoon espresso powder, optional; for enhanced flavor
- 24 ounces (3 standard packages) cream cheese, at room temperature; reduced-fat is fine
- 1 cup granulated sugar
- 4 large eggs, at room temperature
- 1 teaspoon vanilla extract
- 2 tablespoons all-purpose flour
Instructions
- Preheat the oven to 375°F. Lightly grease a 9" spring form pan.
- To make the crust: Crush, grind, or otherwise pulverize the cookies together with the sugar; a food processor works well here. If desired, set aside about a tablespoon of the crumbs to garnish the finished cake.
- Add the melted butter, processing briefly or stirring until the mixture is evenly crumbly. Press the moist crumbs into the bottom and partway up the sides of the prepared pan.
- Bake the crust for 15 minutes. Remove it from the oven, and set it aside as you make the filling.
- Reduce the oven heat to 350°F.
- To make the filling: Combine the milk and chocolate chips in a small saucepan or microwave-safe bowl or large cup. Heat, stirring frequently, until the chips melt and the mixture is smooth. Remove from the heat, stir in the espresso powder, and set the mixture aside.
- In a large mixing bowl, beat together the cream cheese and sugar at low speed, until thoroughly combined. Scrape the bottom and sides of the bowl, and beat briefly, just until smooth.
- Add the eggs one at a time, beating to combine after each one.
- Stir in the vanilla, then the flour.
- Add the chocolate/milk mixture, beating slowly until thoroughly combined. Scrape the bottom and sides of the bowl; beat briefly, just until smooth.
- Pour the batter atop the crust in the pan.
- Bake the cake (remember, the oven temperature should be 350°F) for 45 to 50 minutes, until a toothpick inserted into the cake 1" from the outside edge comes out clean. A digital thermometer, inserted at the same point, should read 175°F. The center may not look set; that's OK.
- Turn off the oven, crack the door open several inches, and allow the cake to cool in the oven for 1 hour. Remove the cake from the oven, and set it on a rack to finish cooling. When it's completely cool, cover the cake, and refrigerate it until ready to serve.
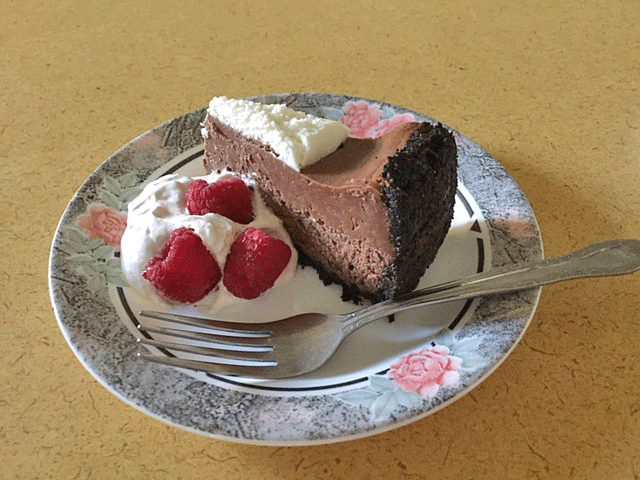
- Garnish the cake with the reserved crumbs, if desired. Serve it in small slices, with whipped cream and berries.
- Yield: one 9" cake, 16 to 24 servings.
Notes:
- To prevent cracking, allow the cheesecake the full hour to partially cool in the turned-off oven. This is very important. Cheesecakes have to cool very gradually. I wasn’t able to do this and had to remove it about 20 minutes earlier than desired, and it formed a deep crack. (Which explains why I had to put whipped cream on top.)
- As soon as you turn the oven off, run a knife around the top edge of the cheesecake to loosen it from the pan. This, too, will help prevent cracking because cheesecakes shrink as they cool. Then leave it in the oven for the full hour.
- If the cheesecake does crack, just cover it with a bit of whipped cream. Cracking is unsightly, but it doesn’t affect the flavor
- I personally do not do the toothpick test. This encourages cracks to form when the cake starts to cool. To test for doneness, jiggle the cake very slightly. If the center looks loose and “liquid-y,” bake another 3-5 minutes. If the cake is fully cooked, the center will appear soft and not set, but it won’t jiggle like liquid. It will firm up as it cools.
You might also like...

Need a little more chocolate in your life?
Sign up for monthly "Chocolate Chips" and receive this e-booklet FREE
"Ten Surprising Facts About Chocolate"
Sign up below and you'll receive a link where you can download your e-booklet immediately.
More Chocolate!
Get this 10-pg. booklet FREE when you sign up for Uncommonly Chocolate's monthly "Chocolate Chips."

Recent Articles
-
The Elusive Perfect Chocolate Cake
I’ve spent a lifetime looking for the perfect chocolate cake – cocoa flavored, moist, dense yet tender, with a true fudge icing. Who knew it was right under my nose all along? -
Hot Chocolate
Hot chocolate drinks are a natural choice for cold weather. Alcoholic or not, they are sure to keep you warm on frosty evenings. Here are a few to get you started. -
Santa Fe Chocolates
Santa Fe is known for its climate and art galleries. Now come discover Santa Fe chocolates. Chocolate elixirs are a specialty, but how about chocolate covered chile peppers? -
Bourbon Chocolate Pecan Pie
Bourbon Chocolate Pecan Pie gives a new twist to an old favorite. It turns a deadly sweet dessert into a rich treat fit for royalty. -
The perfect chocolate mousse
In my perpetual quest to find the perfect chocolate mousse, I've discovered it's all about the air bubbles. -
Hill of Beans
For rich, fresh roasted flavor, you can't go wrong with A Hill of Beans coffees, both flavored and straight roasts. -
ChocZero Sugar-Free Chocolate That's Guilt-Free
Discover the wonderful taste of sugar-free chocolate that even diabetics can eat. It’s low carb and teeth-friendly, and it's even high in fiber.

